Beach Hut or Not?

Journey Girls has been very focused on new accessories for the dolls in the last few years, not just outfits and shoes, but larger accessories such as the set being reviewed today. The largest set to be released, the Beach Hut, retails for around $80. That is a hefty price for anything, but especially for a wood based product. Is the Beach Hut worth $80? Is it worth waiting for a good sale? How well made is it? Let’s find out!

Journey Girls wood-based products have not been stellar in the past. Personally, I have shied away from them because of all of the issues that I have been e-mailed about. I have the vanity set (which had no issues at all) and the picnic table (which was missing pieces), both of which I love. I purchased the Beach Hut when there were two sales going on at the same time…a 30% off deal and “Spend $40 on JG items, get $10 off”. So with tax, I paid $49, which I thought was decent. I was hesitantly optimistic when I opened the box.
Warning: This is a large set! It will take 30 minutes to an hour to put together.

The set is well protected in the box, with foam in between pieces and a fabric foam separating scratchable surfaces. It was easy to get all of the pieces out and determine if all the pieces were present. Everything was accounted for, so I began putting together my hut. Be forewarned, this set is not at all put together.

Even the little table that comes with the set needs to be assembled. Much different than Our Generation or American Girl sets, which are mostly put together. The other thing that you will notice immediately is that the set is completely wood based. Although the wood is nice, it creates its own issues. The biggest issue is that the wood is either a fiberboard with a sticker on it (like the walls), or it’s pine (like the frame).

None of it is sealed or finished, meaning that water is this sets enemy (which is kind of ironic since it is a beach hut!). If the set gets wet the stickers will bubble and the wood will stain.
I would suggest taking all of the pieces out and laying them on your working surface. It makes it much easier to find the pieces. The first step is to connect the frame to the flooring. Each frame piece has a tiny pilot hole to make it easier to get the screw in it.

I used a battery powered drill to get the screws most of the way in, then hand tightened them at the end. Tightening them too much makes them strip the soft wood of the pine.

I used a battery powered drill to get the screws most of the way in, then hand tightened them at the end. Tightening them too much makes them strip the soft wood of the pine.
Next, you will add the porch to the main base. When I went to put the porch on, the bolt had no cross mark in it to turn it.

I had another bolt in my personal arsenal that I could replace the defective one with. Annoying, but not detrimental.

Next, add the small pillars for the porch rail. (If you are looking at my photos, you will notice that I missed this step...whoops). Putting the rail pillars on before the legs just make it easier.
This step also includes attaching the bed, which is a little bit of a trick. Add the back block first (part B1), screwing it in so that the hole is towards the porch.

Slide the bed into the hole, then add the other block (part B2) on the other side.

Holding the bed while screwing on the block is not easy so you may want to set up something to help hold the bed in place.

On the next step, I ran into my detrimental issue. While trying to put the legs on the bottom of the hut I found that my set was missing the wood pieces that the legs screw into.

This is a major oversight in quality control. I understand a piece missing such as a screw or even a wood piece, I don’t like it, but I can understand it.


Missing an attachment point is a manufacturing issue! The floor is missing an attached piece. There is no getting around going forward from here. So, I made a return trip to Toys R Us to exchange the set for a new one. I opened the box in the store to make sure all the pieces were there and that the pieces were not missing any parts.
Once I got the new set home I continued on with building the beach hut. Screwing in the legs I noticed that not one of them was all the way straight.

The ones for the porch actually don’t touch the ground. Again, it isn’t something that wrecks the hut, but it is annoying. Even at $50, the legs should be straight and all of them should touch the ground.
Once the legs are on you will add the rails to the porch. Be aware that the porch uses a different type of screw than those you have been using for the other parts.

It uses the same screws you used to fasten the main frame to the base. (I read too quickly and used the wrong screws).

It uses the same screws you used to fasten the main frame to the base. (I read too quickly and used the wrong screws).

Adding the sides comes next. Make sure to get the sides into the little slots in the frame. The frame of the roof will help hold the walls together, but at this point, the tops of the walls may not stay in the frame’s slots.

The walls will feel more solid once the roof frame and cross-member are on. Ad the curtain rod to the wall and the surfboard bed holder to the adjacent wall. My bed holder was not very tight, which is okay as the bed will make it tighter when it is up.
Add the angled roof frame and then the cross-member to make the house much more stable.


The next step is to add the roof section opposite the porch.

Make sure that the frame is pulled in as much as it can be and that the wall is still in the slots. Then screw the roof on.
On the other side of the hut, near the porch, you will add the pergola supports.

Once the pergola supports are added, you can attach the roof to this side. Finally, add the last pieces of wood to complete the pergola.

To complete the beach hut you must string the hanging plant through the hole on the front of the roof frame, tying a knot to secure it.

Twist the legs onto the little table to complete the whole set.

There are stickers that can be added to the walls to make the beach hut your own. Other pieces in the set include two skinny little beach chairs, a plastic shell lamp, two tropical drinks, a ladder to get into the beach hut, and a towel.
The beach chairs are really cute, super simple, and not the right size for the Journey Girls.

They consist of purple clothes hanger like wire bent into the shape of a chair, with purple flowered cloth as the back and seat. The chairs should really be about an inch wider to fit the Journey Girls well. I love the pattern on the fabric. And I love the fact that the chairs stack easily.

Although very cute, the plastic shell lamp is an oddity. I was excited about it because I thought it would function. I thought there would be a tiny LED in it that let it light up. It does not.

The little pink shell does right into the white shade, with no type of light. Maybe TRU wanted to keep the set simple. Maybe they didn't want parents to have to buy batteries when the light died. Whatever the reason, the light is just a prop.
Sitting at the beach, you need a fun drink. The two tropical drinks look like coconuts, with little orange umbrellas (or tops) and a yellow straw. Like many Journey Girls accessories, the coconuts are hollow and are monochromatic.

As I snarkily pointed out before the umbrellas look more like tops than umbrellas, but you know what they are. The drinks kind of balance on the dolls hands, but are way too big to fit in their hands.
Similar in design, the hanging plant has the same coconut design, but instead of an umbrella and straw coming out the top, there are green leaves. It is a cute accent piece for the hut.
It's wonderful to have real curtains, even if they are very light. The pink material is very light and flowy. It slides easily across the bar to open them. Because the bar is the same length as the window the curtains can't open all the way, but they open most of the way.

Unlike the huts legs, which were all kind of off. The little table's legs were nice and straight. The aqua blue topped table is big enough for the shell lamp and both drinks, but not much more. It doesn't fit by the head of the bed, but can fit in the corner by the porch...or outside in the sand. Simple and functional.
If you have any of the Journey Girls swim outfits, you will recognize the towel. A thin cotton material, white with thin aqua strips.

I wish that the towel was longer and wider so that it fits the dolls better, but it's nice to have. It hangs nicely on the little hook on the side of the hut.
On the surfboard bed, a thin foam mattress covered in the same purple material that the chairs are sits without actually attaching to the bed. A flat pillow is also included, again with the same purple material.
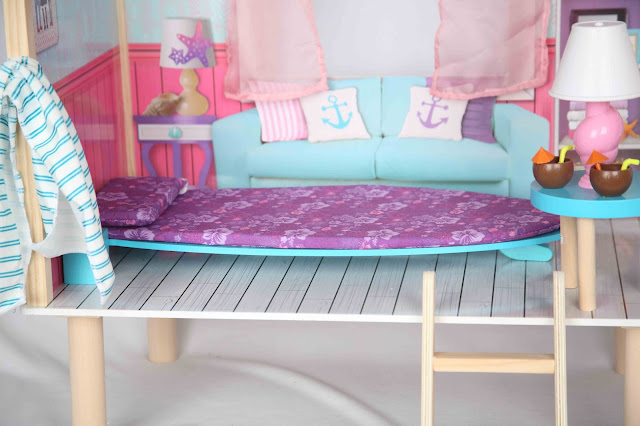
The great thing about the mattress being flat is that the bed can fold up with the mattress on it and still use the wall hook. You will have to take the pillow off though.

There is just enough room to slide the pillow between the side of the bed and the wall. There are no problems with the bed's ability to fold up and down...although I do wonder if the wood will get worn down with lots of play.

The little ladder sits nicely on the side of the hut, thanks to the notch in the wood. It's nice that you can move it to wherever you want on the side.

Although the hut is built well, it is not perfect. There are gaps between the roof and the wall.

On my first hut, some of the stickers were scuffed badly.

My hut does not sit flat because the legs are not quite even, which is not a factor in the sand, but on a hard floor, it is. For the most part, the hut is pretty sturdy. None of the particle board is super thick and sturdy, but it will work

If a child decides to lean on the hut with their whole weight though, it will definitely break.
Even though this is a good size set (at 14 inches wide, 35 inches long, and 30 inches tall), a part of me wishes that the hut was just a little bigger. Give the girls a little more room to move around in the hut, especially with the bed down.

I also wish that the bookshelves were real instead of a sticker and that the photo frames, shutters, and mailbox (on the outside) were more three dimensional, rather than just part of the larger sticker wall.
Overall this is a great set. It's not perfect, but it is worth the sale price. I don't feel like it is worth the full $80 that it retails for, only because it is missing things that would make it worth that much. Journey Girls is finally

Rating
All ratings are out of 10
Playability 8 – There are a lot of great things that come with this set. I like the accessories, such as the chairs, the drinks, and plant. This is not an Our Generation set though, which have 20 to 50 accessories in every big set like this. I think that an OG set would be closer to $100 also, so the absence of all those accessories makes sense. The hut has plenty of room to move the dolls around inside and on the porch. When the bed is down there isn't as much room, but there is still enough room to walk the dolls around. As I mentioned, I would love to have this already large set be a little bit bigger and have a few more things to interact with (bookcases, mailbox, photos on the wall, etc.). A fun set that has a great amount of playability.
Value 8 – The value on the beach hut depends on the price you pay. For the $50 I paid, this has great value (a 9 or 10), at $79.99 it's closer to a 6 or 7. Again, the set is not bad in any way, it's just not quite perfect. The construction does not feel completely solid. As with many Journey Girls wooden items, this set had issues with screws, wood quality, and pieces missing. My second set was not missing any pieces and all of the screws were good, however, the wood is still easy to strip out of, so don't over tighten the screws. The set comes with adequate accessories, although I am a bit perplexed as to why there is not a surfboard included...or even offered in the US (Canada and Australia have it available in a separate set). If you can buy the beach hut on sale, it is well worth the price.
Quality 6 – This set has a lower score than it maybe should because it makes me nervous. While transporting the hut to the beach for photos I was very aware of how worried I was of picking the hut up by the roof or grabbing it by the window. While putting it together I was very careful not to overtighten the screws (as I had on the first set, stripping it from the wood). Even with hand tightening alone the screws can be stripped. Do not over-tighten the screws! As a whole, the wood pieces feel okay, but as you take them out of the box individually they feel very delicate. I was very deliberate to make sure that the pieces didn't get scratched or bent. Lastly, it surprises me that the wood is not sealed in some way. Dirty hands are going to make this light wood gray very easily. It also makes it more difficult to get marker or crayon off of the wood. Although that can be a good thing, as it makes customization easier. I don't think that normal play will ruin this set. It is fairly sturdy. I do think that if a child uses it to stand or maybe even stomps their dolls hard enough on some of the wood (like the roof) it may not handle that. Of course, this is speculation as I did not try to break my hut.
Overall 8 – As one of the first larger sets to come from Journey Girls, this is a great set. There are things that can be improved, but it is a fun set with enough accessories to make it enjoyable. If you can find it when there is a Journey Girls sale it would be well worth the money to buy it. I would open the box in the parking lot to make sure all the pieces are there, just so that you don't have to come back if things are missing. If this is going to be given to a child for Christmas or a birthday, you may want to put it together before giving it to them, as it does take 30 minutes to an hour to put together. And remember...don't over tighten the screws! :)

4 comments:
Thank you for such an in depth review. I also purchased this on sale, but haven't opened it yet. It seems like it could be a fun display piece and I plan to keep it unless there are parts broken or missing. I'd like to see Journey Girls make more large items like this and up the quality a bit, but this is a good start.
Thank you for a great review, I'd love to have this, though not for my Journey Girls, I'd like it for my ball jointed dolls!! As I live across the road from the beach it would be the perfect accessory for them. However, as it is highly unlikely that it would ever become available here in Spain and would probably cost a fortune to ship from the US, I think I will have to just enjoy your photos of it instead :)
Great review and set! Thank you for your thoughts and the attention to detail in the set up tutorial.
~Xyra
I think if you coated the whole thing with modge podge it would make a little water repellent. I plan to coat ut, Maybe spray the wood pieces before I put it together with varnish and coat the rest with the mogde podge, t woukd also strengthen it.
'You did a wonderful tutorial and I know will help me when I put it together. Thank you.
Post a Comment