One Way to Fix a Journey Girls Arm

A while back I showed you how to fix Dana's arm. Some people noted that their doll's shoulder joint did not look the same as Dana's did. I found out the the newer Journey Girls have two types of shoulder joints. Most still have the joint like Dana, but some of the dolls (Meredith, Mikaela, and Kyla) have different joints. This tutorial is on how to fix/replace this new type of joint.
Before we start, let me tell you that this is not the easiest replacement to do. If any of you have an American Girl doll and have replaced her strings, Journey Girls joints are not as simple as that. It takes some commitment to do this fix; probably about 2 hrs at least. Also the vinyl chest piece is solid on the bottom, so opening the cloth back will not help with the shoulder joint.
Here are the tools you will need:
Needle nosed pliers (curved is better)
Wire cutter
Scissors
Small flat head screwdriver
X-acto knife or hobby knife
Embossing tool or hair dryer
Drill with a 5/32 size bit
100 grit sandpaper
Ruler
100 grit sandpaper
Ruler

Supplies you will need for 2 joints:
Bungee cord (found online or at some camping stores)
Four 5/16 brass compression inserts (found at hardware stores - usually in the plumbing department)
Four 1 inch leg tips


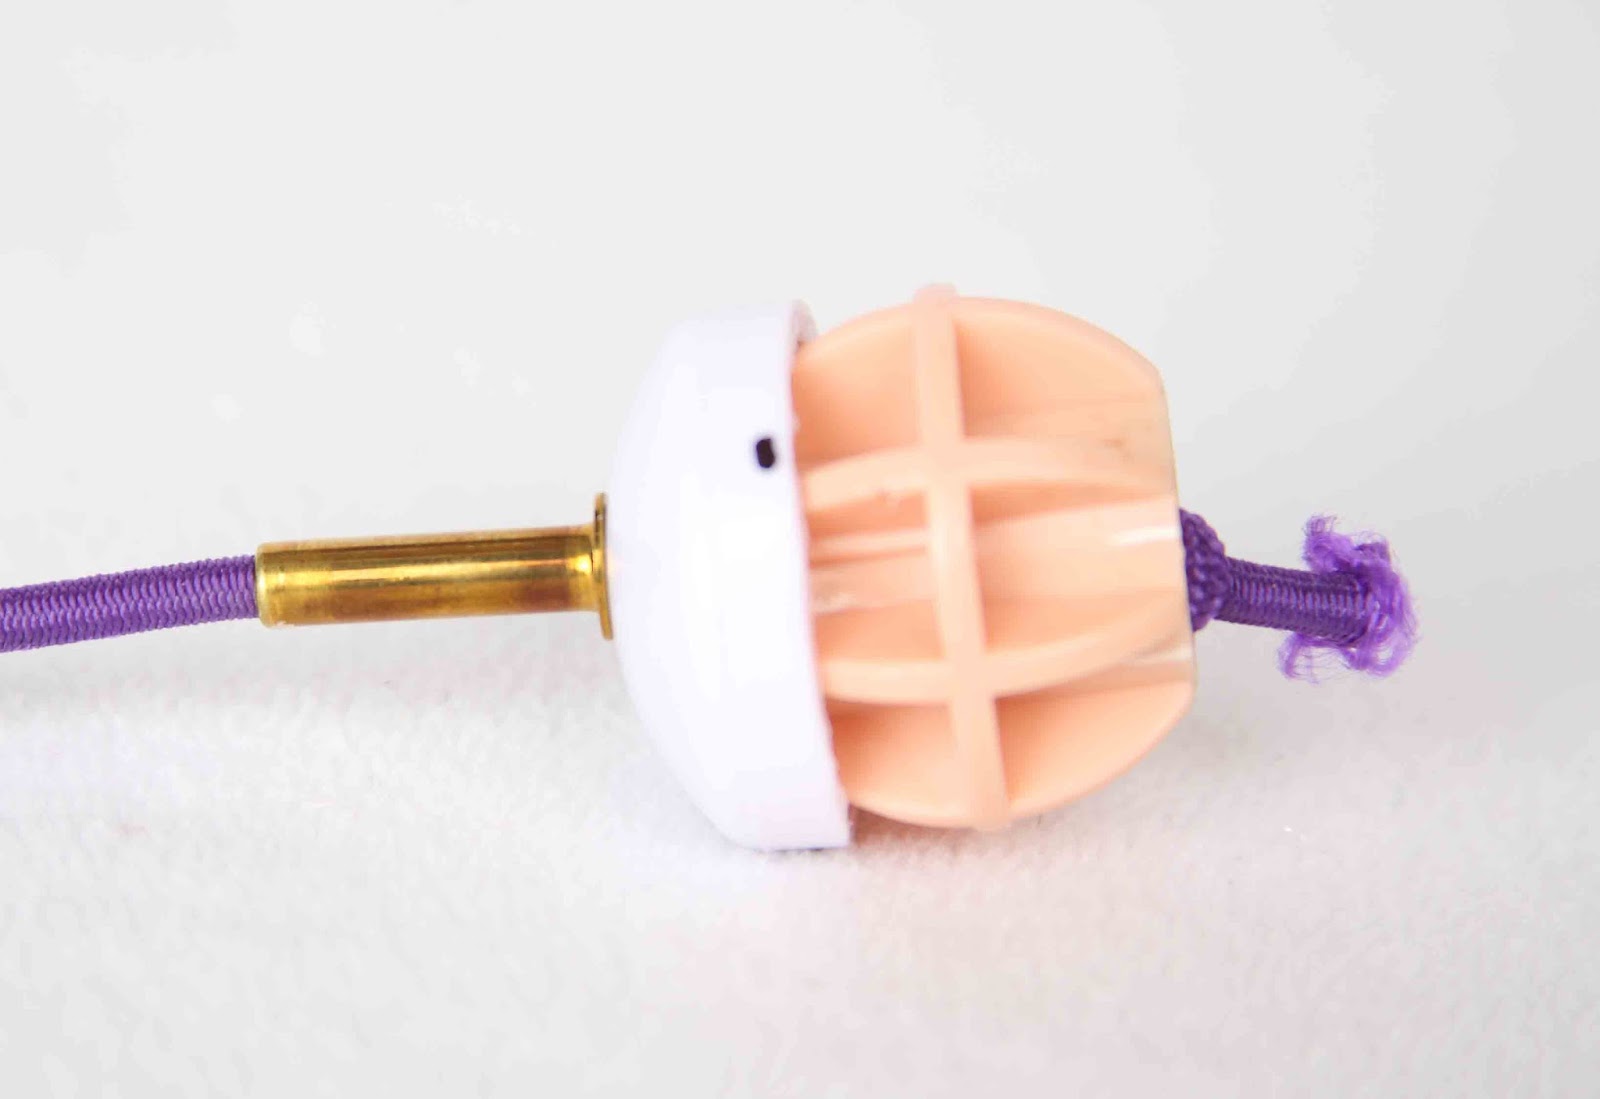
The shoulder joint of the Journey Girls is made up of two parts. A flat coin shaped piece with a rod protruding from the center of it sits in the body. This connects to a sphere with a hole in the middle, that resides in the arm of the doll.


Most of the time the broken arm occurs because the rod breaks off of the coin shaped base, leaving you with a flat hard plastic piece in the body and the sphere with a rod attached to it in the arm.

If you're lucky you may be able to grab the rod and pull the sphere out of the arm without heating the vinyl. In my experience this doesn't happen, but if you wiggle the arm enough it technically should be able to happen.

What I have experienced is that without the heat the rod will shear off and then it is more difficult to get the sphere out of the arm. So I would suggest heating the vinyl arm to make it more pliable. With the needle nosed pliers grab the rod and wiggle it back and forth will pulling out from the arm. If you rotate the sphere so that the side shows, the sphere will start to pop out.

Once the sphere is sideways so that you can see the ridge, warm the vinyl again (if it is not still warm), grab the ridge, rotate and pull. You can also stick the screwdriver in the end of the sphere that does not have the broken rod in it (if there is room).

Pull the screwdriver towards you, do not use a levering motion. If you use a levering motion it will push on the vinyl and could ruin the arm. So be careful. You can also squeeze the arm at the shoulder, this will help push the sphere out also. If you can get the sphere out of the arm without damaging it, you will be able to reuse it. If it gets too damaged, don't worry, I'll show you how to replace it.
Once the sphere is out of the dolls arm, you need to get the flat coin piece out of the body. I had to heat the vinyl a little with the embossing tool to get this out. There is glue on the coin. As you heat the joint it should release the glue.

Drill through the coin so that there is something to hold onto.

After heating the vinyl on the body use the drill bit or needle nose pliers to pull the coin out. Wiggle and pull. As you pull there may be places where the glue is stuck to the coin. You can heat the vinyl on the body a little to loosen it or cut it off with the X-acto knife.

Just make sure to only cut in the circle, not on the curved part.
Whether you use the sphere or if you use the leg tips (more on that in a moment) you will have to cut the vinyl out in the armhole of the body. Use the X-acto knife to make a hole by following the larger circle's outline as a guide.. Use an up and down sawing motion to cut the vinyl.

Do not cut any of the curved part of the arm hole out.

If you are using the sphere
Remove the rod from the sphere. You have to break off the tip of the rod, then push it out of the sphere from the side that you just broke off.

Put the sphere to the side.
You have to make a replacement part for the coin using the leg ends. From the rounded base measure up 3/16 or 1/4 of an inch and make a mark. Using the X-acto knife, carefully, make a cut (about the size of the knife blade) on the mark parallel to the rounded edge (you are going to be shortening the tip so that it becomes like a small bowl or cup).

I then made a cut perpendicular to the line up towards the open top of the leg tip.

This made it possible for me to use my scissors and cut all the way around the tip so that the cup was 3/16 of an inch high.

I took the cup and sanded the cut edge with 100 grit sandpaper so that the edge was smooth. It doesn't have to be perfect, just not jagged.

Drill a hole in the middle of the tip with the 5/32 drill bit. The easiest way to do this is to flip it so the round or spherical part of the tip is down. Find the middle and drill through it.

If you are fixing one arm, you will need two of these cups.
Next cut a piece of the bungee cord about 6 inches long.

Tie a knot at one end as close to the end of the bungee as you can make it.

Slide the brass sleeve onto the bungee cord with the fluted end (the larger end) of the sleeve facing towards the knot.

Use the pliers or the wire cutter to crimp the brass sleeve. The sleeve needs to be compressed enough that it will not slide on the bungee.

Once you have the sleeve crimped on the bungee slide the sphere onto the bungee cord so that the square end is facing away from the knot and the brass sleeve is through the sphere.


Add the leg end to the bungee cord with the cut off end of the leg towards the sphere.

Then add the brass sleeve with the flanged end towards the leg end.
Here's where it starts to get tuff. Pull the non-knotted end of the bungee cord as tight as you can, while pushing the sleeve down towards the sphere, then crimp the sleeve.

Make sure to really crimp the sleeve so that it does not move on the bungee. Make a knot in the bungee as close as possible to the brass sleeve. Then cut the excess bungee off.

This is your new fixed joint. Now it's time to get it back into the doll.
I found it was easiest to put the sphere into the arm first, and then put the leg end in the body. To do this, heat the hole in the arm until the vinyl is flexible.

Once the vinyl is squishy push the sphere straight down into the arm. Wiggling it or twisting it helps it get into the arm hole easier. The sphere can get stuck a little as it hits the little ridge of plastic halfway up the sphere. To get the sphere all the way in, push one edge of the sphere in first, working your way around the sphere. Once the middle edge is in the arm, the sphere slides in easily.

Next warm the vinyl on the body around the arm hole.

Stretch the bungee far enough that you can get the tip of the screwdriver in the end not in the arm.

Push the leg tip into the hole in the body, wiggling it or turning it sideways to get it in all the way in. It should pull flat onto the inside of the body once it is in all the way.

If everything is done right the arm should move well, but stay positioned when placed up or down.
If you can't use the sphere
I broke my sphere, because I wasn't careful, so I had to make a new joint. The best thing I came up with were plastic leg tips. I used 7/8 inch tips, but I actually think that the 1 inch tips will work better. From the rounded base measure up 3/16 or 1/4 of an inch and make a mark. Using the X-acto knife, carefully, make a cut (about the size of the knife blade) on the mark parallel to the rounded edge (you are going to be shortening the tip so that it becomes like a small bowl or cup).
I then made a cut perpendicular to the line up towards the open top of the leg tip.
This made it possible for me to use my scissors and cut all the way around the tip so that the cup was 3/16 of an inch high.
I took the cup and sanded the cut edge with 100 grit sandpaper so that the edge was smooth. It doesn't have to be perfect, just not jagged.
Drill a hole in the middle of the tip with the 5/32 drill bit. The easiest way to do this is to flip it so the round or spherical part of the tip is down. Find the middle and drill through it.
If you are fixing one arm, you will need two of these cups. The photo shows four, because I replaced both arms on Meredith.

Next, cut a brass insert in half with the wire cutter. This flattened the end of the insert when I did it, so I had to use the needle nosed pliers to make the sleeve round again. You will need two sleeves for one arm replacement, but only one of them needs to be shortened.

Next cut a piece of the bungee cord about 6 inches long.
Tie a knot at one end as close to the end of the bungee as you can make it.
Slide the longer sleeve onto the bungee cord with the fluted end (the larger end) of the sleeve facing away from the knot.
Use the pliers or the wire cutter to crimp the brass sleeve. The sleeve needs to be compressed enough that it will not slide on the bungee.
Once you have the sleeve crimped on the bungee, slide one of the tips onto the bungee so that the rounded edge is against the fluted side of the brass sleeve.

Next, slide the other tip onto the bungee cord the opposite way that the first one was slide on. It should form kind of a sphere with the two tips. Slide the shortened sleeve onto the bungee with the fluted side towards the rounded edge of the second tip.

Here's where it starts to get tuff. Pull the non-knotted end of the bungee cord as tight as you can, while pushing the sleeve down towards the tip. Make the bungee cord as tight as possible and push the sleeve and tip down as close as you can to the other tip, then crimp the sleeve.

Make sure to really crimp the sleeve so that it does not move on the bungee. If you pull the tips apart there should be no more than a half inch between them. This is your new joint. Now let's put it back in your doll.
I found it was easiest to put the tip into the arm first, and then put the other one in the body. To do this, heat the arm hole until the vinyl is flexible. Pull the tips apart a little, then using the screwdriver, push the tip with the short sleeve into the arm.


Using the bungee you can pull it back so that it is flat against the arm hole. It's hard to see in the photos, but the tip should fit right into the arm hole and create kind of a cup, pressing against the curved edge of the arm.

Warm the vinyl on the body around the arm hole. Stretch the bungee far enough that you can get the tip of the screwdriver in the end not in the arm.
Again push the tip into the hole in the body, wiggling it or turning it sideways to get it in all the way. It should pull flat onto the inside of the body.
If everything is done right the arm should move well, but stay positioned when placed that way.


I have done this replacement twice now. Once on Meredith (both arms) and once on Mikaela (one arm). In both cases the arms moved better than before, with no hitch in them. They were also able to go out to the side more. If the arms don't stay up on their own, then the bungee cord is not tight enough...so make sure that bungee cord is tight!

This design is based off of the joint in an American Girl doll. If you are having trouble following my directions you should be able to look up "American Girl Doll restringing" on YouTube and find some videos about how to kind of do this. I am hoping to post a video at some point, but my video skills are not very good...so for right now a post will have to do.
I will be posting instructions on how to fix leg joints with in a week or so.
If you have any questions please feel free to e-mail me: jgirldolls@gmail.com
I hope this helps one of you Journey Girls fans.
34 comments:
Thank you very much! This is very useful!
Veronika.
Veronica,
Hopefully you will never need the tutorial. :)
JGKelsey
Thanks so much fixed my nieces Mikaela this morning...worked perfect...i used a thick hair elastic inztead of bungee cord...wirked perfect!
Thanks so much fixed my nieces Mikaela this morning...worked perfect...i used a thick hair elastic instead of bungee cord...worked perfect!
Darlene
What if you are completing missing the arm? Anyone know a spot to get it ?
Thank you. My daughters best friend Kyla broke her arm and histeria was about to ensue. Worked amazingly!
Thanks...this tutorial helped us out in an arm loss crisis.
Very helpful! Thank you!
This is incredible. When the doll's arm broke, it was like my daughter lost her best friend. These instructions are excellent and easy to follow. The surgery was a success! Thank you!
Thank you very much for this tutorial.
Thanks for this - saved me some time in engineering my own fix.
My daughter's Alana doll broke this morning in exactly the same way shown on your blog.
Couldn't find 5/8" fitments only 4/16" (1/4") and 6/16" (3/8"). I used the larger ones to have the larger flange and they worked fine.
The only bungee cord I could get a hold of was a little thinner and didn't crimp hard enough to be held tight in the fittings. This is fixed simply by tying a few knots at each end to prevent the cord from sliding through. To be honest, the crimps don't matter much at all as long as the knotted ends can't slide through the fitment.
The ugliest part of your tutorial looked to be cutting the shoulder socket out after removing the "coin", but the way I heated and pryed my coin out it pulled all the "non-curve" part out and I was left with a perfect hole - no cutting required.
Also, having a dremel tool made several parts easier and I completed this in maybe 15 minutes total time spent in between some other tasks.
I like how the new joint doesn't have a noticeable "squeak" like the old one. I do think that this arm may pull out of the socket with less force, but if that is to happen it can just be popped back in. Also, I think the only noticeable drawback from the original arm is that it is a bit easier to move and therefore takes less pressure. Because of this it may not hold the same weight (say you wanted the doll to hold a tray or something). But, it isn't floppy, just not quite as strong.
Overall, I think an A+ fix and A+ guide that can be done without too much hassle.
THANK YOU SO MUCH! I couldn't find the rounded leg cover which I think would have worked better but all in all . . . it is attached and is not going anywhere soon.
Question you state 1inch leg tips but your picture it's 1 1/8 leg tips.which is the correct one to purchase
This was sooooo helpful. My daughter was also hysterical when it happened to her doll and I thought there was no hoping if fixing it. But today I got the courage up and it turned out perfect! Thanks for the detailed instructions :)
I am presently trying to fix Mikaela's arm. I have drilled holes in both sides of the injury and inserted a thin brass rod. I have tried several glues to get it to fit, but have had no luck so far, it has just pulled apart again. I think I will persevere with trying to find a better glue before attempting this radical surgery!
Adrian
Thank you so much for posting this. Like the comments above, my daughter was inconsolable when it happened but your fix worked a treat. I must admit I was skeptical it could work but more that I could do what was required. In the end it was so easy although I couldn't find the brass compression inserts so improvised with some washers. My daughter was left speechless at the end result, then she bawled her eyes out again but this time they were tears of joy!
Thank you so much for posting this. Like the comments above, my daughter was inconsolable when it happened but your fix worked a treat. I must admit I was skeptical it could work but more that I could do what was required. In the end it was so easy although I couldn't find the brass compression inserts so improvised with some washers. My daughter was left speechless at the end result, then she bawled her eyes out again but this time they were tears of joy!
I just wanted you to know that in August 2020, your instructions have saved the limb of a beloved Kyla doll and the hope of a desperate Mom and her teary-eyed girl! Thank you so much it was exactly what I was looking for!
Thank you SO much! This worked really well. My daughter is so happy that her "Vanilla" has been fixed! I used 1" leg cups since I didn't see 1 1/8" ones. I also used a thick hair tie instead of bungee cord. The little brass compression things were tricky to find, but I did end up finding them in the plumbing section at Ace Hardware. They were in the little bulk bins (loose) so I was able to just buy two of them.
Thank you SO much! This worked really well. My daughter is so happy that her "Vanilla" has been fixed! I used 1" leg cups since I didn't see 1 1/8" ones. I also used a thick hair tie instead of bungee cord. The little brass compression things were tricky to find, but I did end up finding them in the plumbing section at Ace Hardware. They were in the little bulk bins (loose) so I was able to just buy two of them.
Randy
Unfortunately, I accidentally cut the curved part of the shoulder socket you said DO NOT CUT! Any suggestions as to how to proceed? It is about 1/8" cut, but I don't want it to grow and become larger.
Thank you
Thank you so much! This worked like a charm!
I was cooking along but now I’m trying to fit the compression fitting through the hole in the sphere and it won’t fit. I’ve got 5/16” fittings. What am I missing? Do I need it in or can I just do the fitting on the other side of the cap?
If I send you my Makayla doll, will you fix it? Kind of kidding, but kind of not...
If I send you my daughter's Makayla doll, will you fix it? Kind of kidding, kind of not...
If I send you my Makayla doll, will you fix it? Kind of kidding, but kind of not...
Thank you so much for a great tutorial! My granddaughter was so excited that we could fix her favourite doll!
Thanks so much for a great tutorial. My granddaughter was so excited we were able to fix her favourite doll!
There is an easier way to fix these dolls...here is the YouTube video of it.
https://m.youtube.com/watch?v=Y_SzdtqbKmk
You can send the doll to me. I have fixed other people's dolls. I just ask for the cost of shipping (which is usually about $15). Email me if you want to do that. jgirldolls@gmail.com
Just the photo of the sphere inside the dolls arm was incredibly helpful but giving 2 separate options to repair the joint were above and beyond my expectations. Thank you so much, Brian
Thank you so much for sharing this, and the YouTube link also. Our Meredith, an impulse “rescue” from the saddest shelf I’ve ever seen in a thrift store, lost her arm this week when my son was dressing her. He was horrified and heartbroken. She is currently wearing a cast while his OG doll attends as her doctor, but it looks like she’ll be going in for surgery very soon. Thank you again for sharing!
-Andrea
Ever repaired a zapf shoulder joint? I can find nothing.
Me too, I need help too please
I have a doll, it's a more modern doll, Baby Born from Zaph Creations, the date on the back is 2006.
One of the arms is really stiff, I have trouble moving it and my granddaughter really struggles.
Would you have any ideas on something that I could lubricant it with. I did write for advice from Zaph Creations, but they won't speak with me as it's longer ago than the guarantee is.
If there's any advice you could give me, I'd really appreciate it.
Thank you in advance
Post a Comment